zaterdag 25 februari 2012

Error 1019038 DB file is missing


During some testing we got an error in Dataforms ‘can’t connect to essbase’ and in EAS: ‘Error 1019038 DB file is missing

At first there was nothing to see so I look in the application log of this Essbase application.

Here I found the real problem:
Disk error ‘no more space left’….. so far for monitoring :S
But when I had made some extra space the error was still here:

Here are the things I did to solve this problem:
  • Don’t panic
  • Stop Hyperion or just Essbase
  • Go to the directory: $ARBORPATH/app/applicationName/databaseName/
  • In this directory there should be the following  two files: databaseName.db and databaseName.dbb
  • If the error is still ‘DB file is missing’ you have to copy databaseName.dbb to databaseName.db
  • Now start Hyperion or just Essbase.


zaterdag 18 februari 2012

Configure Work Bench Client for the Essbase adapter

Configure Work Bench Client for the Essbase adapter.
Start the ‘Work Bench Client’

Login the application you have made

Register the following adapters for FDqM.
  • ES11X-G4-H_1006 

Select the menu ‘File – Register Adapter’ within the directoy: D:\Oracle\Middleware\EPMSystem11R1\products\FinancialDataQuality\SharedComponents\
Select the one you want to register (ES11X-G4-H_1006)


Now import the XML file for the adapter, these are in the same directory:


  • ES11X-G4-H_1006 
 Select ‘Select All’ and click ‘OK’   

You can see the adapter by clicking the [+]

Now we have to configure the adapters


First create a Machine profile:
right click the ‘Machine Profiles’ and choose ‘Add Machine Profile’


Source Machine : (FDM server)
Target Machine  : (Essbase server)
Click ‘OK’

Now we need to setup the adapter:

Right click the adapter and select ‘Configure’


Click the tab ‘Hyperion Essbase Intergration Setup’
Application Name  : Demo
Essbase DB Name  : Basic
Logon Method   : 2- Global

Click the tab ‘Dimentions’

Select a ‘Mapped’ Dimention and click the Target Dimension.

If the connection is okay you’ll see a pull down menu.
If the connection is not okay you’ll see the message ‘Can’t connect to ….’
Click ‘OK’

In note 1342362.1 ‘Unable To Connect To Essbase From Fdm Version 11.1.2.1’ we had to add some variables in the Windows System Path:
In the front:

  • D:\Oracle\Middleware\EPMSystem11R1\bin; D:\Oracle\Middleware\EPMSystem11R1\bin-32
This one to the end:
  • D:\Oracle\Middleware\EPMSystem11R1\products\Essbase\EssbaseClient-32\bin
Also we need to add the ESSBASEPATH in the system variables:
  • ESSBASEPATH: D:\Oracle\Middleware\EPMSystem11R1\common\EssbaseRTC\11.1.2.0

To import reports we have to select menu ‘File - Import’ and goto the drectory:
D:\Oracle\Middleware\EPMSystem11R1\products\FinancialDataQuality\SharedComponents\FinancialDataManagement-Reports11121\ ‘
Select the file ‘StandardReportsOracle1112100Active.xml’ if you are using the Oracle Database. 


 Select ‘Select All’ and click ‘OK’

vrijdag 17 februari 2012

Smartview installation

Smartview installation
Before we install Smartview we have to set some settings:


startup MS excel:


Select menu ‘File – options – Trust Center – Trust Center Settings ’
Set the option ‘Enable All controls wiithout…..’ in the ActiveX Settings.


Set the option ‘Enable all macros….’ In the Marco Settings and close Excel.


Login workspace and select the menu ‘Tools – Install – Smart View’


Select ‘English (United States)’ and click ‘OK’


Click ‘Next’


Select the directory where you want to install smartview.
Select ‘D:\Oracle\Smartview’ and click ‘Next’


Click ‘Install’


Click ‘Finish’


Now the important part:
Due to a bug you have to create the following directory:
C:\Windows\SysWOW64\config\systemprofile\Desktop

also see: 'Export To Excel error "SaveAs method of Workbook class failed" or "Open Method of Workbook Class Failed" in FDM 11.1.2 [ID 1132723.1]'


donderdag 16 februari 2012

Configure Financial Reporting and R&A with NAT

When I had to install some Client software I came across the situation that there was a NAT configured. Below the solution for this problem (after 1 week of trying and long nights)
 
Define FR Settings for Network Address Translation
· Open the Windows Registry Editor in the FR Web Application server.
· Navigate to HKLM\Software\Hyperion Solutions\FinancialReporting0\HyS9FRReports
Note the current value for JVMOptionCount
· Create a new String Value JVMOption# where # = JVMOptionCount + 1.
· Assign the value "-Djava.rmi.server.hostname=<public IP or public hostname of FR Web App Server>" to the String Value created in step 4.
· Create a new String Value JVMOption# where # = JVMOptionCount + 2.
· Assign the value "-Djava.rmi.server.useLocalHostname=false" to the String Value created in step 6.
· Edit JVMOptionCount to increment the value by 2.
Restart the FR Web Application for the settings to take effect.

Define R&A Framework Settings for Network Address Translation
· Log into Workspace
· Select Navigate->Administer->Reporting and Analysis->Services
· Right-click on "Report and Analysis Framework" and select Properties from pop-up menu
· Select "General" tab
· Locate "JAVA_OPTS" under the "Manage" section
· Select the "Values" field associated with the "JAVA_OPTS" Property
· Enter the string "-DuseHostname=true" in the Value List dialog and select the ">" icon to move the string to the "Assigned Values" field.
· Edit the Oracle\Middleware\common\raframeworkrt\11.1.2.0\lib\default-domain.cfg to add the following property:policies:iiop:server_address_mode_policy:publish_hostname="true";

FDqM: Unable to create Load Balance Manager object!

During some testing in FRqM I came across some strange errors:

"Unable to create Load Balance Manager object!
Please verify that the user name, password, and domain are correct
Error=Cannot create ActiveX component."
 

We did check the username and password for the DCOM user and all is okay, but somehow it did not make the relation between FDqM and the DCOM user.

We did the following to solve this issue:
  • Start the ‘dcomcnfg’ tool in Windows
  • Expand Component Services\Computers\My Computer\Dcom-Config and locate the following object: {E652643D-6CC1-48AC-915D-01842B04F29} 
  • Right-click and choose "Properties" and click on the "Security" tab
  • Click the "Edit" button and remove all users except the default: "Everyone" and "System" and click OK, then set the radio button to "Use Default"
  • Click the "Edit" button under Access Permissions and remove all users/groups except the default items and click OK, and set the radio button to "Use Default"
  • Now click the "Identity" tab and remove the ID in the "This User" field and set the radio button to "The Launching User" and click "Apply" and "OK"
  • Now try to launch the FDM Load Balance Config and all the extra tools for FDqM.

Internet Explorer Settings - Hyperion

Internet Explorer Settings

Oracle describes in Doc id: 820892.1 the recommended Settings for Oracle Hyperion Products in combination with Internet Explorer 7, 8 and 9.

1. Configure browser to check for new version every time user visits a page
  • Open Internet Explorer
  • Go to Tools > Internet options > General
    In "Browsing history" section click on "Settings" button and then select "Every time I visit the webpage" option
  • Click OK, then Apply.

2. Disable default pop-up blocking
  • Open Internet Explorer
  • Go to Tools > Internet options > Privacy tab
  • Uncheck "Turn on Pop-up Blocker"

3. Add Workspace URL to trusted sites
  • Open Internet Explorer
  • Go to Tools > Internet options > Security tab
  • Select "Trusted sites" from "Select a zone to view or change security settings" window, then click on "Sites" button.
  • Type your workspace URL in form http://workspaceserver:portnumber in "Add this website to the zone"
  • Uncheck "Require server verification (https:) for all sites in this zone"
  • Click Add, then Close.
  • Click OK and Apply.

4. Minimize security setting for trusted sites
  • Open Internet Explorer
  • Go to Tools > Internet options > Security tab
  • Select "Trusted sites" from "Select a zone to view or change security settings" window
  • Select custom level
  • From "Reset to:" list select "Low"
  • Click OK
  • Click Apply, then OK

5. Customize security settings
  • Open Internet Explorer
  • Go to Tools > Internet options > Security Tab
  • Select zone containing your Oracle Hyperion servers and click on "Custom level..." button
  • In "Miscellaneous" section enable options "Access data sources across domains" and "Allow script-initiated windows without size or position constraints"
  • In "ActiveX controls and plug-ins" section enable "Run ActiveX controls and plug-ins" and "Script ActiveX controls marked safe for scripting".

6. Enable option "Always allow session cookies".
  • Open Internet Explorer
  • Go to Tools > Internet options > Privacy Tab > Advanced. Check the "Override automatic cookie handling", accept the first and third party cookies and check the "Always allow session cookies" option.

7. Disable option "Enable Native XMLHTTP".
  • Open Internet Explorer
  • Go to Tools > Internet options > Advanced Tab. In "Security" section uncheck the option "Enable Native XMLHTTP".

9. Only for SSL enabled environments: Disable option "Do not save Encrypted Pages to Disk".
  • Open Internet Explorer
  • Go to Tools > Internet options > Advanced Tab. In "Security" section uncheck the option "Do not save Encrypted Pages to Disk".

woensdag 15 februari 2012

Install Hyperion Reporting studio


Install van Reporting studio

Go to the directory where you have downloaded the FR studio and click on the FinancialReportingStudio.exe file

 
Select the Language and click ‘OK


Click on ‘Next


Change the installation directory to ‘D:\Oracle\FinancialReportingStudio’ and click on ‘Next


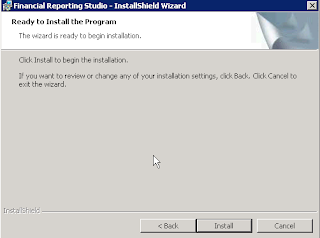
Click on ‘Install


Click on ‘Finish
Testing the Financial Report Studio

Start the tool:

D:\oracle\FinancialReportingStudio\products\financialreporting\bin\HReports.exe
or


Start – All Program’s – Oracle – Financial Reporting Studio – Financial Reporting Studio


Select a username and password:

User-ID             : admin
Password         : xxxxxxxxx
Server-URL       :
http://hostname:19000

And click ‘OK
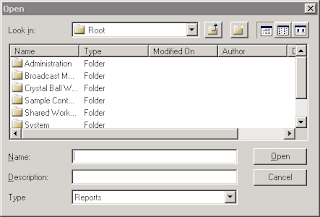
Select ‘File’ and click on ‘Open

Once you see this screen you can see that FR studio is making a connection to the Oracle Database. This means that you configuration is OK

Edit the config file:
Now we have to edit the configuration file:

Edit this file and save it: D:\oracle\FinancialReportingStudio\products\financialreporting\install\bin\FRSetupPrintServer.properties

#--------------------------------------------------------
# Contains configuration settings for the Print Server
#--------------------------------------------------------
 
# Specify Financial Reporting Web Application Server
FRWebServer=http://[hostname]:19000
 
# Administrator Credentials for the Report Server
AdminUser=admin
AdminPassword=xxxxxxx

SetupPrinterServer
Now within a DOS box start:
 
D:\oracle\FinancialReportingStudio\products\financialreporting\install\bin\FRSetupPrintServer.cmd


Check the log file for error’s: D:\oracle\FinancialReportingStudio\products\financialreporting\install\logs\ frprint-config—H--.M--.S--.log

Check the HRCreatePrinters.ini for the correct path for log files. (Is this path realy there, if not create it or change the log directory)

Remove the Password from the ‘D:\oracle\FinancialReportingStudio\products\financialreporting\install\bin\FRSetupPrintServer.properties’

Start extra service that is created:

  • Hyperion Financial Reporting - Print Service  (HyS9FRPrint)